First steps with Mermaid, a diagramming and charting tool
Table of Contents
Mermaid is a Javascript-based tool that renders Markdown-inspired text definitions to create diagrams. In this tutorial you’ll learn how to start and render your first diagram.
Installation
You can use Mermaid in their Live Editor: https://mermaid.live. If you prefer the command line, there’s a tool called mermaid-cli. My recommended way to install this tool is doing a local installation with npm. Create a folder to install mermaid-cli and run this command inside that folder:
npm install @mermaid-js/mermaid-cliThe executable (mmdc) is located inside ./node_modules/.bin/. If you want, you can create a symbolic link to one of your $PATH paths (such as $HOME/.local/bin) to access the tool from any folder:
# Example, adapt it to your file paths
ln -s /home/ricardo/Documents/tests/mermaid/node_modules/.bin/mmdc /home/ricardo/.local/bin/mmdc
There are other alternative installation methods (NPM global installation, docker), check GitHub page.
Usage (mermaid-cli)
Diagram definition
There is a great documentation page on https://mermaid-js.github.io/mermaid/intro/. I’m going to show you a basic example with a flowchart.
Create and edit a text file (e.g.: graph1.mmd). mmd is the recommended file extension, but it’s a simple plain text file.
Diagram declaration
On the first line, specify the diagram type: flowchart, sequenceDiagram, gantt, classDiagram, gitGraph, erDiagram or journey. For this example, type flowchart (you can also type graph). After the diagram name, you can add some optional diagram parameters. For a flowchart, you can specify the orientation (top-to-bottom TB, left-to-right LR, etc.). For a left-to-right diagram, type LR after flowchart:
flowchart LRNodes
On the next line, with an optional identation (using TAB or spaces), is where you declare your diagram nodes. The simplest way to create two connected nodes is:
A --> BBut you can declare an ID for the node and its text separately:
A[First node] --> B[Second node]The [ and ] defines the node shape. To create a rounded node, use () or ([]):
A(Rounded corners) --> B([Stadium shape])There are other node shapes, check the documentation.
Links
There are also other link types:
- Open link:
A --- B. - Dotted link:
A -.-> B. - Thick link:
A ==> B. - Multi-directional link:
A <--> B.
You can also add text in the middle of a link:
A[One] --> |text|B[Two]Style
There are several global diagram themes, but you can change the color of each node separately. First, create a class definition (you can add it at the beginning or the end of the diagram definition):
classDef <class name> <class properties>Each property consists of a property name, a colon (:) and the property value, You can add several properties separated by commas (,). For color properties, always use hexadecimal values to define the color (e.g.: #000 or #55aa7f). Some of the available class properties are:
fill: node background color.color: text color.stroke: stroke color.stroke-width: stroke width (e.g.:stroke-width:2px).
classDef red fill:#A00,color:#FFF,stroke-width:0pxThen, to apply the style to a node, add :::<class name> after the node ID (but you cannot add the node text after the class name, so add a new line if needed):
# This will work
A:::red
# This also works
A:::red --> B[Some text]
# But this will not work
A:::red[Some text]
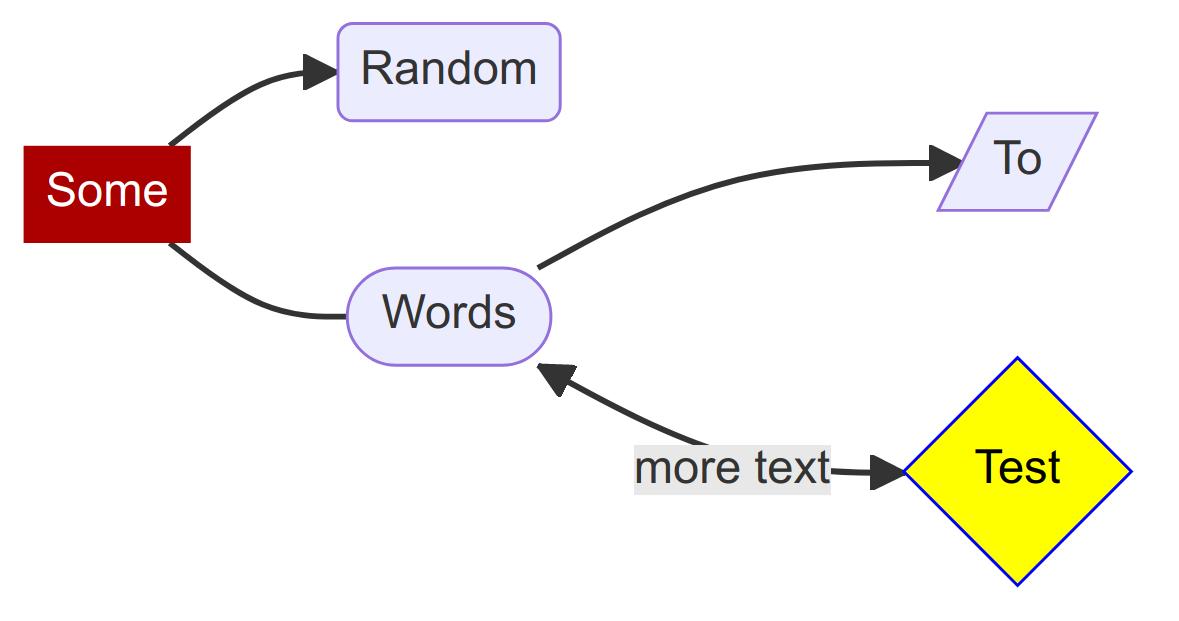
Full diagram definition example
graph LR
    A[Some] --> B(Random)
    A:::red --- C([Words])
    C --> D[/To/]
    C <--> |more text|E{Test}
    E:::yellow
    classDef red fill:#A00,color:#FFF,stroke-width:0px
    classDef yellow fill:#FF0,color:#000,stroke:#00F
Render the diagram
To create the diagram, run (remember to use the mmdc executable path if you’ve not created a symbolic link):
mmdc -i graph1.mmd -o graph1.pngYou can create PNG, SVG or PDF files. By default, PNG image resolution is low, but you can increase it with the -s (scale) parameter (default value: 1).
mmdc -i graph1.mmd -o graph1.png -s 3To specify a different theme, use the -t parameter with one of these theme names: forest, dark, neutral. To define a transparent background for PNG images, add -b transparent.
If you have any suggestion, feel free to contact me via social media or email.
Latest tutorials and articles:
Featured content:


