Creating static websites with Astro
Table of Contents
Astro is a framework for building content-driven websites that are fast and lighweight, by using easy-to-manage components and integrations with third-party services.
Similar to Jekyll, you can create static or server-based websites easily that are optimized to reduce the overhead on the client side.
Install
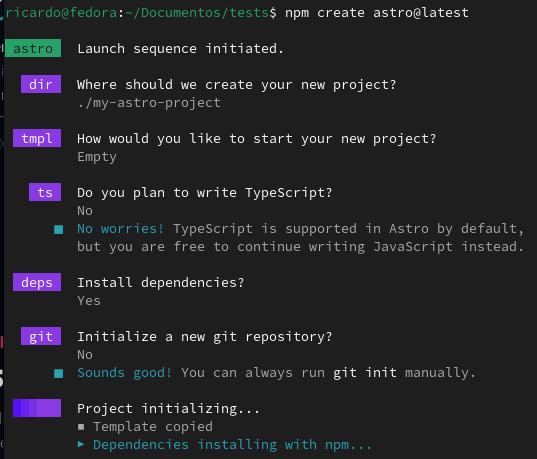
You will need Node.js installed on your system, with the NPM package manager. Creating an Astro project is as simple as running this command (you don’t need admin privileges):
npm create astro@latestYou can create the project on the same folder in which the command is executed (by typing . when Astro asks for that) or in a new folder (for example, ./my_new_folder). Astro also asks you to create an empty project (with only the essential files) or create a sample website to test. I recommend you to choose Empty to not be overwhelmed with so many files and folders.
If there is some dependency installation error, try running npm install inside the project folder.
error Error
      ▲  error Dependencies failed to install, please run npm install to install them manually after setup.
Astro commands
After creating your project, to run Astro commands first you need to add npm run astro (for example npm run astro build). To simplify this, you can create an alias inside your ~/.bashrc file:
alias astro='npm run astro'Running in developer mode
To test your project, run astro dev. Your project will compile and a new local web server will be created.
Compiling for production
When you are ready to compile your project to export it to a hosting service, run:
astro buildThen, copy the files from dist folder to your hosting service or web server.
Project structure
After running npm create astro@latest, some folders and files are created inside your project folder. There are two basic folders: src, where you add your website code, and public, where you add static files like videos, PDFs or images you don’t want Astro to optimize. When compiling a project, the resulting files will be generated inside dist folder.
Inside src, a folder named pages will be created. This is where you add your website content (likely Markdown files). You can also created two more folders inside src:
layoutsfor adding HTML templates.components: to create code that will be used repeatedly (for example, the contents of the<head>tag)
.astro files
Astro use their own files with the .astro suffix. These are simple text files that work like a enhanced-HTML files. They have a designated zone at the beginning, separated by --- with some Javascript code.
---
import Base from '../layouts/Base.astro';
const pageTitle = 'Search'
---
Creating a simple website
Basic template
After creating the project, create a folder named layouts inside src. Then, create a template named Base.astro inside layouts. This will be the main website template. Open the file and add the Javascript zone we will need later. Below that, add the basic HTML tags:
---
---

<!DOCTYPE html>
<html lang="es">
<body>
    <slot/>
</body>
</html><slot/>will add the page content when compiling.
When creating each page, you can reference this template with an import command and with a tag:
#src/pages/some_page.astro
---
import Base from '../layouts/Base.astro';<Base/>Components
Now, add components (small chunks of code that you can use on several parts of your project). Create the components folder inside src. Add a component name Head.astro (for example) to add your <head> tags.
---
---
<head>
    <meta charset="utf-8"/>
    <meta name="viewport" content="width=device-width,initial-scale=1"/>
    <meta name="description" content="My website">
    <title>My website</title>
    <link rel="icon" href={"/favicon.png"} />
</head>- Add your favicon image inside
public/.
Import a component
Now, to include your Head.astro component in your Base.astro template, open the template file and add this inside the Javascript zone:
---
import Head from '../components/Head.astro';
---
Then, inside the HTML code, insert the component:
<Head/>Variables
You can create Javascript variables and export them to any .astro file. For example, inside your Head.astro file, import a variable called myTitle:
---
const { myTitle } = Astro.props;
---
And add it inside <title> tag:
<title>{ myTitle }</title>Then, when using the <Head/> component inside your Base.astro template file, add the myTitle property:
<Head myTitle="My website"/>Note: you can add constants, like the website name, on a file named .env inside you project folder (WEBSITE_TITLE='My website'). Then, to reference that constant on the Head component, use { import.meta.env.WEBSITE_TITLE } instead of { myTitle }.
Adding pages
Inside pages/ you add your website content, like blog entries. You can write in Markdown (.md) or HTML (using .astro files).
Markdown
Add the article layout, title, summary, thumbnail, etc. inside the --- zone.
---
layout: ../../../../../layouts/Post.astro
title: My article
pubDate: 2024-03-01
summary: Some description
thumbnail: /src/images/img_5902.jpg
---
On the template (Post.astro), import article info with const { frontmatter } = Astro.props;:
---
import Base from '../layouts/Base.astro';
const { frontmatter } = Astro.props;
---
<Base title={frontmatter.title}>
    <h2>{frontmatter.title}</h2>
    <slot/>
</Base>
HTML (.astro)
Use the import statements inside the Javascript zone:
---
import Base from '../layouts/Base.astro';
---
And add the template tag after that:
<Base>
# Your page content goes here
</Base>
Integrations
TailWind CSS
astro add tailwindPageFind
npm i astro-pagefindAdd this line to the import statements on astro.config.mjs:
import pagefind from "astro-pagefind";And add pagefind() to the integrations list (inside defineConfig section).
Inside your search page:
import Search from "astro-pagefind/components/Search";<Search id="search" className="pagefind-ui" uiOptions={% raw %}{{ showImages: false }}{% endraw %} />To change default colors:
<style is:inline>
    .pagefind-ui {
        --pagefind-ui-primary: #eeeeee;
        --pagefind-ui-text: #eeeeee;
        --pagefind-ui-background: #152028;
        --pagefind-ui-border: #3e637e;
        --pagefind-ui-tag: #152028;
    }
</style>
To define the title that shows with each result, add this property to your article title HTML tag (a <h2> tag, for example): data-pagefind-meta="title".
To select the pages to index (when you don’t want to index all pages), add this as a property on the HTML tag that has the content:
data-pagefind-bodyUse data-pagefind-ignore to exclude specific sections.
Note for using Pagefind outside Astro: Pagefind can be used with other static web generators, like Jekyll. Simply use npx command (from Node.js) and specify the folder with the generated HTML pages. For example:
npx -y pagefind --site _siteSitemap
astro add sitemapAdd your website URL inside defineConfig section on the astro.config.mjs file:
export default defineConfig({
  site: 'https://example.com',
Add the reference to the sitemap file on the appropriate template or component:
<link rel="sitemap" href={"/sitemap-index.xml"} />More
Conditionals
{<condition> ? <if yes> : <if not>}:
{isHome ? <title>{title}</title> : <title>{title + " - " + import.meta.env.SITE_TITLE}</title>}If you have any suggestion, feel free to contact me via social media or email.
Latest tutorials and articles:
Featured content:


